How do I set up a project?
Written By Gareth Lloyd
In order to set up a project, you will need to fill out a “Project Creation form” in the ‘Tickets’ section of our Feedback portal.
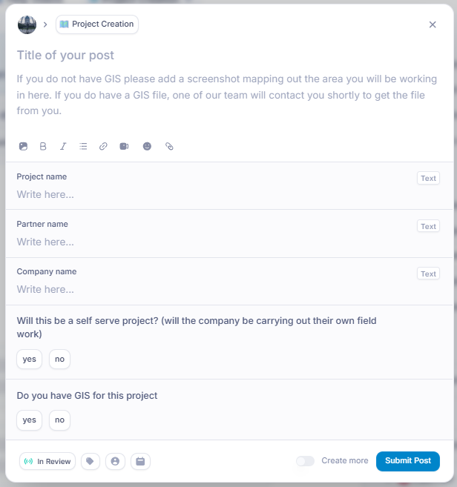
Project name, some of our clients have specific naming criteria, if this is the case, please let us know the precise name you would like the project to be set up under.
Partner name and Company name, we need to know who the project is to be set up under so that we can ensure that the correct people have visibility of the project.
Will this be a self-serve project? (will the company be carrying out their own field work), when setting up the project we need to know who will be in the field carrying out the work. Again, this allows us to make sure the correct users have full visibility in the app.
Do you have GIS for this project, if you have the GIS for the area you plan on working in, we will contact you about getting the file over to us. If not, then don’t worry, just let us know the geographical area by sending us a screenshot which maps out the project area and we can get that set up.
If you do have the GIS for the projects, then we require specific data for the upload to be successful.
Polygons (DMA) – Operational or geographical boundaries. (if the file does not contain this, we will use the minimum geometry boundary tool to automatically create a boundary for the area)
Lines (Pipelines) – Representation of the pipe network. We require the attribute table to include information for the diameter of the pipe (integer (32 bit), the material (text string) and the type of main (e.g distribution main or service line)
Points (Assets) – An individual file should be used for each type of asset (Hydrants, Valves, Meters etc.), this will allow us to make sure that the asset is represented by the correct symbol on the app to save confusion. If you will be using the utilities asset ID to track locations, then please add these in a column named “key”. Each asset ID must be unique otherwise the file upload will fail.
Please make sure when checking the above attribute tables, there are no ‘null’ values, if the column is text, then ‘null’ should be changed to ‘unknown’. If the column is integer, then ‘null’ should be changed to ‘0’.
All text within the file must use only the Latin alphabet.
When you are happy all the information is correct, the GIS file must be provided as a Shapefile in a flat .zip archive with no internal folders.
It must include:
· .shp – Geometry
· .shx – Index
· .dbf – Attribute table
· .prj – Coordinate system (must be ESPG recognised)
· .cpg – Encoding (must be UTF-8)
The file must not be any larger than 10GB (uncompressed)
Please note, once the project has been created and approved, we are not able to edit it. It is therefore, absolutely vital that all information provided to us is correct.
Was this helpful?
Still need help? Ask the team